


How long should I charge my battery and how long does it last?
How to charge my E-Ceros Revolution tablet?
How to increase the battery life?
How to transfer files from PC to the Revolution tablet through USB?
What can I use the Micro-SD card slot for?
Why does the screen of the tablet look dim?
How to change the menu language?
Do I have to charge the battery before use?
What type of memory cards are compatible?
What to do if the unit does not respond?
Can I easily restore default factory settings?
Does the tablet come with a stylus?
Can I replace my battery? What is the type?
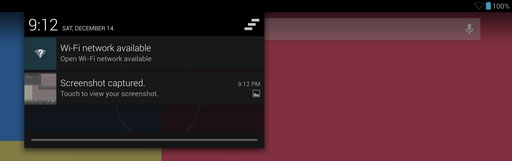
How to take screenshots?
Can I read and open Microsoft Office documents, pdf files?
Can I use it as an ebook reader?
Can I connect my E-Ceros tablet to external speakers?
How to Turn Wi-Fi on and connect to a Wi-Fi network?
How to Connect devices via Bluetooth?
Menu navigating
Managing apps and memory usage
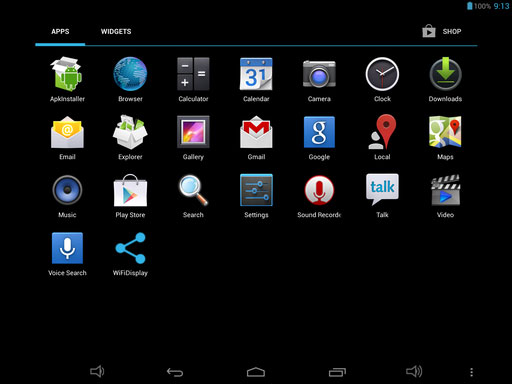
Using the Apps screen
Can I use any of my personal email addresses to send/receive email?
How do I delete apps that I have already downloaded on my E-Ceros tablet?
How long should I charge my battery and how long does it last?
1. It takes about 5 hours to fully charge the battery, however when using for the first several times it’s recommend to charge for approx. 12 hours.
2. Depending on work mode, enabled functions, load, etc the battery can last up to 4 to 7 hours or more.
3. Battery usage time can be shortened if the device is multi tasking apps, running 3D games, using WIFI, powering a USB device, or the screen brightness is set to max.
How to charge my E-Ceros Revolution tablet?
1. The device has a DC input port for battery charging.
2. Simply connect the included wall charger to any standard wall outlet then connect the round DC-IN port using the AC adaptor.
How to increase the battery life?
In order to see which application uses the most battery resources, check battery data chart in Settings >> Battery menu.
Below are some examples to help increase battery life:
• Turn off Bluetooth or Wi-Fi when not in use
• Turn off Wi-Fi Notifications
• Turn off Background Data
• Turn off Auto Sync
• Reduce Brightness
• Change screen time out
How to transfer files from PC to the Revolution tablet through USB?
1. Connect the unit to your computer through the USB cable. A “USB connected” message will appear with USB icon in the notification area.
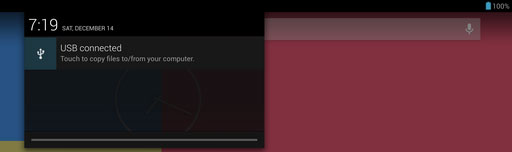
2. Tap this message, and then press the “turn on USB storage” option.
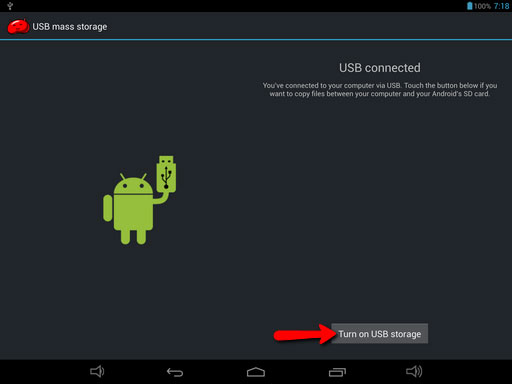
3. After this, the computer will recognize the connected device connected as a USB mass storage drive. You can access it with Windows Explorer (My Computer), or with your favorite file manager software.
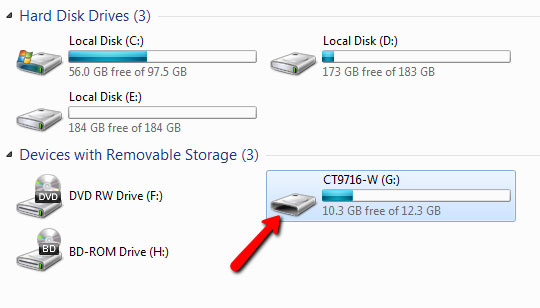
[Windows 7 My Computer window]
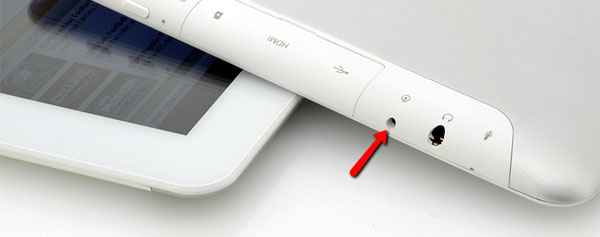
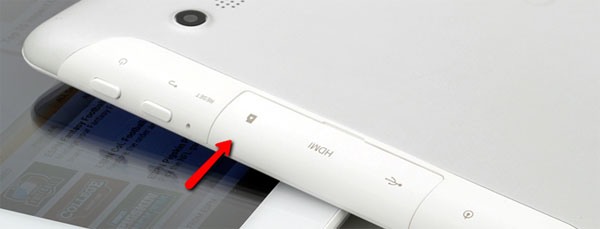
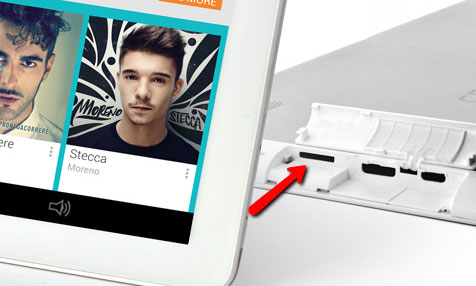
What can I use the Micro-SD card slot for?
1. It is used to extend the memory storage space by use of a micro SD card (also known as TF card). A micro SD card is not included.
2. You can store files and play the media files stored in the micro SD card via the card slot with the device.
3. The memory card slot is located next to the HDMI port. Push the memory card entirely into the slot until it makes a click sound and locks.
or
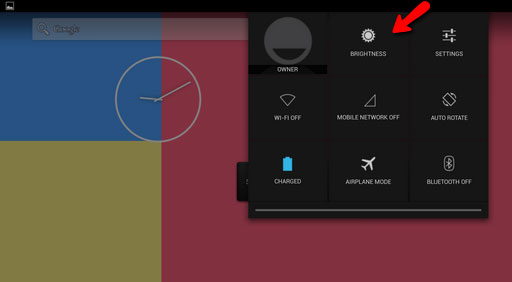
Why does the screen of the tablet look dim?
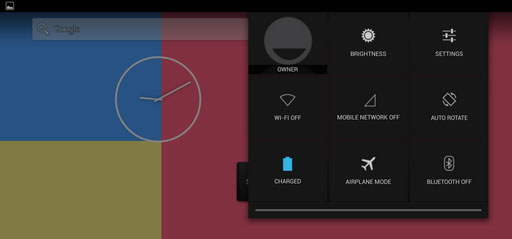
Try to adjust the brightness of the screen. You can find brightness settings either in the Quick Settings Menu by sliding down the right side of the top bar or Go to “Settings” –>”Display”–>”Brightness” to set the brightness level and display timeout.
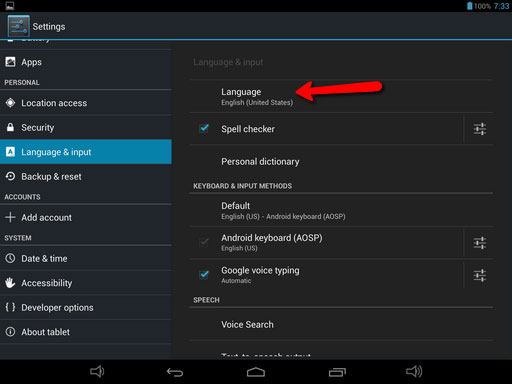
How to change the menu language?
Go to the Settings, choose “Language&Input”> “Language” and then select your desired language. If the menu was accidentally set to an unknown language then it could be tricky to find the above mentioned menu items.
1. Find the settings icon ![]() . You can find it on the Favorites tray, in the All apps menu, or in the Quick Settings menu.
. You can find it on the Favorites tray, in the All apps menu, or in the Quick Settings menu.
2. Scroll down the menu, to find the “Language&Input” option. You can recognize it from this icon ![]()
3. Tap the first menu option on the right side to see available languages.
Do I have to charge the battery before use?
It is best to charge the battery continuously for about 12 hours before you use the device for the first time.
What type of memory cards are compatible?
The E-Ceros Revolution tablet supports Micro SD also known as TF cards. For best results, we recommend to use a branded high quality, high speed memory card.
What to do if the unit does not respond?
1. A Reset button is available on the side of the unit, inside the hole, located next to the Back button.
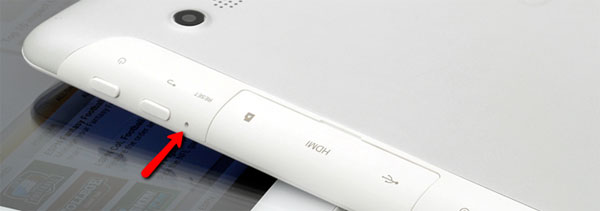
2. This Reset button is a helpful tool because it can provide an immediate restart of the E-Ceros Revolution tablet. You can press this button using a thin tool such as a paperclip. After pressing the reset button, simply turn on the device and you’re ready to go.
3. This reset and refresh can be opportune when:
- There are many applications running at the same time and the device slows down too much and does not respond for a long time
- When an application causes a malfunction or freezes the tablet.
Can I easily restore default factory settings?
1. Sure. If you desire to return to the default factory settings, then you need to perform factory data reset.
2. Factory data reset option can be found under Settings > Backup & reset menu.
3. The factory data reset formats the data partitions so all user data will be deleted. Keep in mind to backup your data first as factory resetting will delete all data stored.
Does the tablet come with a stylus?
1. The Revolution tablet has a multitouch capacitive touchscreen.
2. It is sensitive even to slight finger touch so responds quickly and accurately.
3. There is no need to use a stylus. A stylus was a recommended tool for use with resistive touchscreens so is not needed with a capacitive touchscrenn. However if you wish, a special stylus designed for capacitive screen can be used.
Can I replace my battery? What is the type?
1. The battery of the tablet is built in. It is not replaceable.
2. Opening the product will void the warranty.
3. Do not replace the battery personally without any permission from technical personnel.
4. To replace the battery, consult our technical personnel and follow their instructions.
How to take screenshots?
There are two methods to make screenshots:
1. Press and hold Back + Power buttons for 3 seconds.
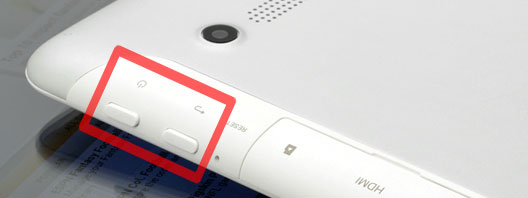
2. There is special menu option in the settings for controlling a screenshot button which, when activated, is placed on the system bar along with the volume, back, home and recent buttons. Just press this button and the screenshot will be saved automatically.
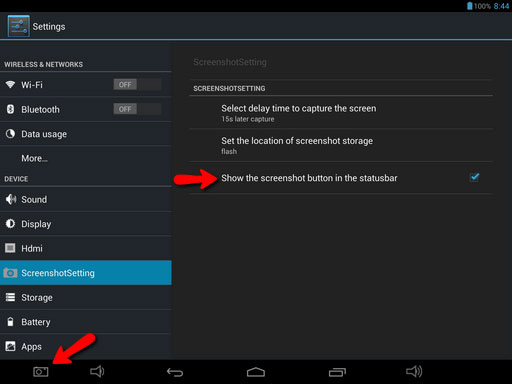
The pictures are stored in Screenshots folder, and automatically listed in the default Gallery app.
Can I read and open Microsoft Office documents, pdf files?
1. The unit does not come with preinstalled office suite application.
2. If you wish to read Office Documents, open Google Play Store and search for office suite apps like Google’s brand new Quick office and install it.
3. You can also find many alternative free or paid document viewer apps for the Play Store.
Can I use it as an ebook reader?
1. Yes, you can. While this tablet is not a dedicated ebook reader device since it uses a color IPS screen rather than a dedicated e-ink display, you can easily and comfortably use it to read ebooks.
2. If you wish to read ebooks, open the Play Store app then select and download your desired ebook reader app.
3. Many ebook reader apps are available for free. The most popular ebook reader apps include Aldiko, Kobo, Kindle, Nook, Moon+, Google Books, Cool Reader, FBreader, Mantano. You can select any of these, or download one that matches your requirements the best!
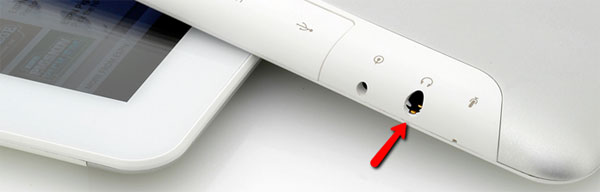
Can I connect my E-Ceros tablet to external speakers?
Yes, just connect the standard 3.5mm stereo audio jack via a male to male 3.5mm jack cable to an audio input port of a speaker, and you’re ready to play sound through external speakers. Similarly, you can connect standard 3.5mm earphones to the tablet.
How to Turn Wi-Fi on and connect to a Wi-Fi network?
1. Touch Settings > Wireless & networks > Wi-Fi
2. Slide the Wi-Fi switch to the On position.
The device scans for available Wi-Fi networks and displays the names of those it finds. Secured networks are indicated with a Lock icon. If the device finds a network that you connected to previously, it will connect to it.
3. Touch a network name to see more details or connect to it, and if the network is protected, type the password.
4. Or, if your Wi-Fi router supports Wi-Fi Protected Setup, touch the WPS icon ![]() on your device, and then touch the same button on your router.
on your device, and then touch the same button on your router.
5. To modify a network’s settings, touch & hold the network name.
How to Connect devices via Bluetooth?
You must pair your tablet with a Bluetooth device before you can connect to it. Once you pair your device with a device, they stay paired unless you un-pair them.
1. Under Settings > Wireless & networks, make sure Bluetooth is turned on.
2. Touch Bluetooth. Your device scans for and displays the IDs of all available Bluetooth devices in range.
3. If your device stops scanning before your Bluetooth device is ready, touch Search for devices.
4. Touch the ID of the Bluetooth device in the list to pair with it.
5. Follow the instructions to complete the pairing. If you’re prompted to enter a passcode, try entering 0000 or 1234 (the most common passcodes), or consult the documentation or manual that came with the device. If the pairing is successful, your device connects to the device.
If the Bluetooth device you want to pair the tablet with isn’t in the list, ensure that the Bluetooth device is turned on and set to be discoverable.
Menu navigating
1. At the bottom of every screen, no matter which screen you are on, you’ll always find these three navigation buttons:
- Volume – : Reduce volume level
- Back: Opens the previous screen you were working in, even if it was in a different app. Once you back up to the Home screen, you can’t go back any further in your history.
- Home: Opens Home. If you’re viewing a left or right Home screen, opens the central Home screen. To open Google Now, swipe up.
- Recent apps: Opens a list of thumbnail images of apps you’ve worked with recently. To open an app, touch it. To remove a thumbnail from the list, swipe it left or right.
- Volume + : Increase the volume level
- Menu button: Touch it to explore additional options, often including a Help item that provides more information about that screen.
2. If you don’t use these buttons often, they may shrink to dots or fade away, depending on the current app. To bring them back, touch their location.
3. On the All Apps screen (also known as App Drawer menu) available from the Favorites tray, notice the Settings icon ![]() . This brings you to the Settings screens for your tablet, where you can adjust things like network, sound, and account settings, among many other functions.
. This brings you to the Settings screens for your tablet, where you can adjust things like network, sound, and account settings, among many other functions.
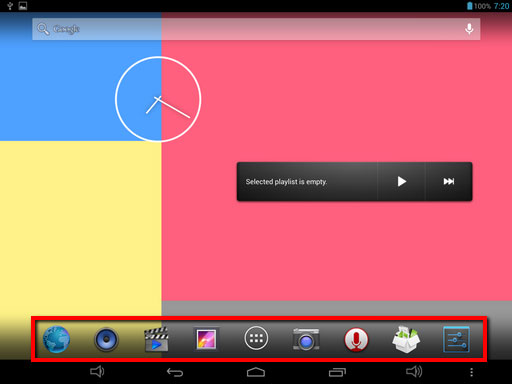
4. At the top of the screen you’ll find Google Search, which lets you search your tablet or the Internet. Touch Google to type your search terms, or the Microphone icon ![]() to speak the terms;
to speak the terms;
5. Many screens in apps and Settings include a Menu icon ![]() . Touch it to explore additional options, often including a Help item that provides more information about that screen.
. Touch it to explore additional options, often including a Help item that provides more information about that screen.
6. The top bar actually includes 2 drop down menus. On the left pull down the bar and the notification menu appears. Here you can find all the notification and information provided by the system or apps. By pulling downwards on the right hand side of the bar, the Quick Settings menu appears. This menu includes Brightness-, Wi-Fi-, Bluetooth-, Screen rotation, Airplane mode settings, Battery information and a shortcut to the Settings menu.
Managing apps and memory usage
1. You typically don’t need to worry about managing apps beyond installing, opening, and using them. However, there may be times when you want to know more about what’s happening behind the scenes in order to better manage your storage.
2. Important: Android manages and carefully guards the portion of internal storage where the system, apps, and most data for those apps are stored as this area may contain your private information. It’s not possible to view this portion of internal storage when you connect your device to a computer with a USB cable. The other portion of internal storage, where music, downloaded files, ect, remains visible for your convenience.
3. You’re able to optimize your memory usage by:
- Uninstalling apps you don’t use.
- Deleting downloaded files or files you created.
- Copying files between your device and a computer via USB or Bluetooth.
- Removing content from Google Play that’s saved for offline use and streaming it via a Wi-Fi or mobile network.
Using the Apps screen
1. The Apps screen allows you to adjust several aspects of the way your device uses memory. To view these settings, go to Settings > Device > Apps.
2. You’ll see four tabs at the top of the screen, each displaying a list of apps or their components:
- Downloaded. Displays apps you’ve downloaded on Google Play or other sources.
- On SD card. Downloaded apps which are transferred to NAND Flash Storage.
The graph at the bottom of the Downloaded and On SD card tabs shows the internal memory storage usage details. - Running. Displays all apps, processes, and services that are currently running or that have cached processes, and how much RAM they are using.
3. The graph at the bottom of the Running tab shows the total RAM in use and the amount that is free. Touch Show cached processes or Show running services to switch back and forth.
- All. Displays all apps that came with Android and all apps you downloaded on Google Play or other sources.
4. To switch the order of the lists displayed in the Downloaded or All tabs, touch Menu![]() >Sort by name or Sort by size.
>Sort by name or Sort by size.
5. To view details about an app or other item listed under any tab, touch its name. The information and controls available vary among different types of apps, but commonly include:
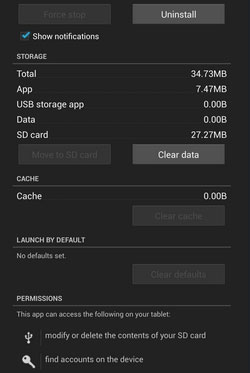
- Force stop button. Stops an app that is misbehaving. Stopping an app, process, or service may cause your device to stop working correctly. You may need to restart your device after doing this.
- Uninstall button. Deletes the app and all of its data and settings.
- Move to SD card. Transfers the app to the NAND flash storage.
- Disable button. Prevents the app from running, but does not uninstall it. This option is available only for some apps and services that can’t be uninstalled.
- Clear data button. Delete an app’s settings and other data without removing the app itself.
- Clear cache. If the app stores data in a temporary area of the device’s memory, this lists how much information is stored, and includes a button for clearing it.
- Launch by default. If you have configured an app to launch certain file types by default, you can clear that setting here.
- Permissions. Lists the kinds of information about your device and data the app has access to.
Can I use any of my personal email addresses to send/receive email?
1. Yes, you can. If you have a Google (Gmail) mail account, feel free to use the preinstalled Gmail app ![]() . Once you signed in with this account, the emails, contacts and all related data will be synced. If you want to use a 3rd party mail service, you can use the app “Email” or download a corresponding app from Google Play Store.
. Once you signed in with this account, the emails, contacts and all related data will be synced. If you want to use a 3rd party mail service, you can use the app “Email” or download a corresponding app from Google Play Store.
2. Using 3rd party email service with “Email” ![]() app, you should enter incoming/outgoing email server address, port, log in details, protocols then you are ready to send/receive emails. Most of the email service providers already have dedicated email apps, available in Play Store (eg. Yahoo mail, yandex mail, outlook, etc). Usually these apps provide more advanced features than the standard Email app.
app, you should enter incoming/outgoing email server address, port, log in details, protocols then you are ready to send/receive emails. Most of the email service providers already have dedicated email apps, available in Play Store (eg. Yahoo mail, yandex mail, outlook, etc). Usually these apps provide more advanced features than the standard Email app.
How do I delete apps that I have already downloaded on my E-Ceros tablet?
Tap Settings >Apps, and then choose the application that you want to delete. Tap Uninstall button to delete it.